React中的过渡动画
- 动画插件:react-transition-group
- npm install react-transition-group —save
Transition
与框架无关,常见的CSS动画使用方法:
1 | .start{ |
CSSTransition
CSSTransition具有三种状态
- 开始状态,对应的类是-appear、-enter、-exit
- 执行动画,对应的类是-appera-active、-enter-active、-exit-active
- 执行结束,对应的类是-appera-done、-enter-done、-exit-done
CSSTransition常见属性:
in:触发进入或退出状态
- 如果添加了unmountOnExit={true},那么该组件会在执行退出动画结束后被移除掉
- 当in为true时,触发进入状态,会添加-enter、-enter-acitve的class开始执行动画,当动画执行结束后,会移除两个class, 并且添加-enter-done的class
- 当in为false时,触发退出状态,会添加-exit、-exit-active的class开始执行动画,当动画执行结束后,会移除两个class,并 且添加-enter-done的class
classNames:动画class的名称
- 决定了在编写css时,对应的class名称:比如card-enter、card-enter-active、card-enter-done
timeout:动画过渡的时间,指的是动画执行后添加-enter-done的时间,动画真实执行时间由transition决定
appear:是否在初次进入添加动画(appear和in都要为true、同时要设置-appear类)
CSSTransition的钩子函数:
- onEnter:在进入动画之前触发
- OnEntering:在进入动画时触发
- OnEntered:在应用进入动画结束时触发
- ……
css代码:
1 | /*设置初始状态,不发生动画的状态,可以用appear的三个类替代*/ |
jsx代码:
1 | import React from "react"; |
SwitchTransition
控件两种状态之间的切换:on和off指定两种状态
mode属性:
in-out:新组件先进入,旧组件再移除
out-in:旧组件先移除,新组件再进入
SwitchTransition组件里面要有CSSTransition或者Transition组件,不能直接包裹要切换的组件
- SwitchTransition里面的CSSTransition或Tasnsition组件不再像之前那样接受属性来判断元素状态,取而代之的是key属性
css代码:
1 | h2{ |
- 起始状态可以没有,那么刚开始就是默认状态
- out-in模式:先制性exit代码,再执行enter代码,没有h2show-enter-done,动画执行结束会回归初始状态,可以没有h2show-exit-done
- in-out模式:先执行enter代码,再执行exit代码,没有h2show-exit-done,动画结束会回归初始状态,可以没有h2show-enter-done
jsx代码:
1 | import React from "react"; |
TransitionGroup:
- 有一组动画时,可以将这些CSSTransition放入到TransitionGroup中
有些搞不懂,官网看教程吧
React中CSS的编写
CSS组件化!!!:
- 可以编写局部css:css具备自己的局部作用域,不会污染其他组件的元素
- 可以编写动态css:可以获取当前组件的一些状态,根据状态生成不同的css样式
- 支持所有的css特性:伪类、动画、媒体查询等
- 编写起来简单方便,符合一贯的css风格特点
内联样式
- style接受小驼峰命名属性的JavaScript对象,而不是字符串
- 可以接受state中的状态来设置相关的格式
内联样式优点:
- 样式之间不会有冲突
- 可以动态获取当前state中的状态
内联样式缺点:
- 都需要驼峰标识
- 某些样式没有提示
- 大量样式,代码混乱
- 某些样式无法编写,比如伪类/伪元素
普通CSS
将CSS编写到一个单独的文件,之后进行引入
和普通网页开发中的编写方式一致
按照普通的网页标准去写,那么不会有太大的问题
但是组件化开发中我们总是希望组件是一个独立的模块,样式只在自己内部生效,不会相互影响
- 但是普通的CSS都属于全局的CSS,样式组件会相互影响
这种编写方式的最大问题是样式之间会相互层叠掉
CSS modules
- 将.css文件修改为.module.css看就可以引用并且局部使用
- 但是类名不能使用(.home-title),因为JavaScript不识别-
- 所有的className都必须使用{style.className}的形式来编写
- 不方便动态的修改某些样式,依然需要使用内联样式的方式
CSS in Js
CSS in Js是一种模式,其中CSS有javaScript生成而不是在外部文件中定义
- 传统的前端开发中,HTML、CSS、JavaScript通常分类
- React认为逻辑和UI是无法分离的,所以才会有了JSX的语法
- JSX是Html in Js,加上CSS in Js在完整的体现的逻辑和UI无法分离,因此React被称为All in JS
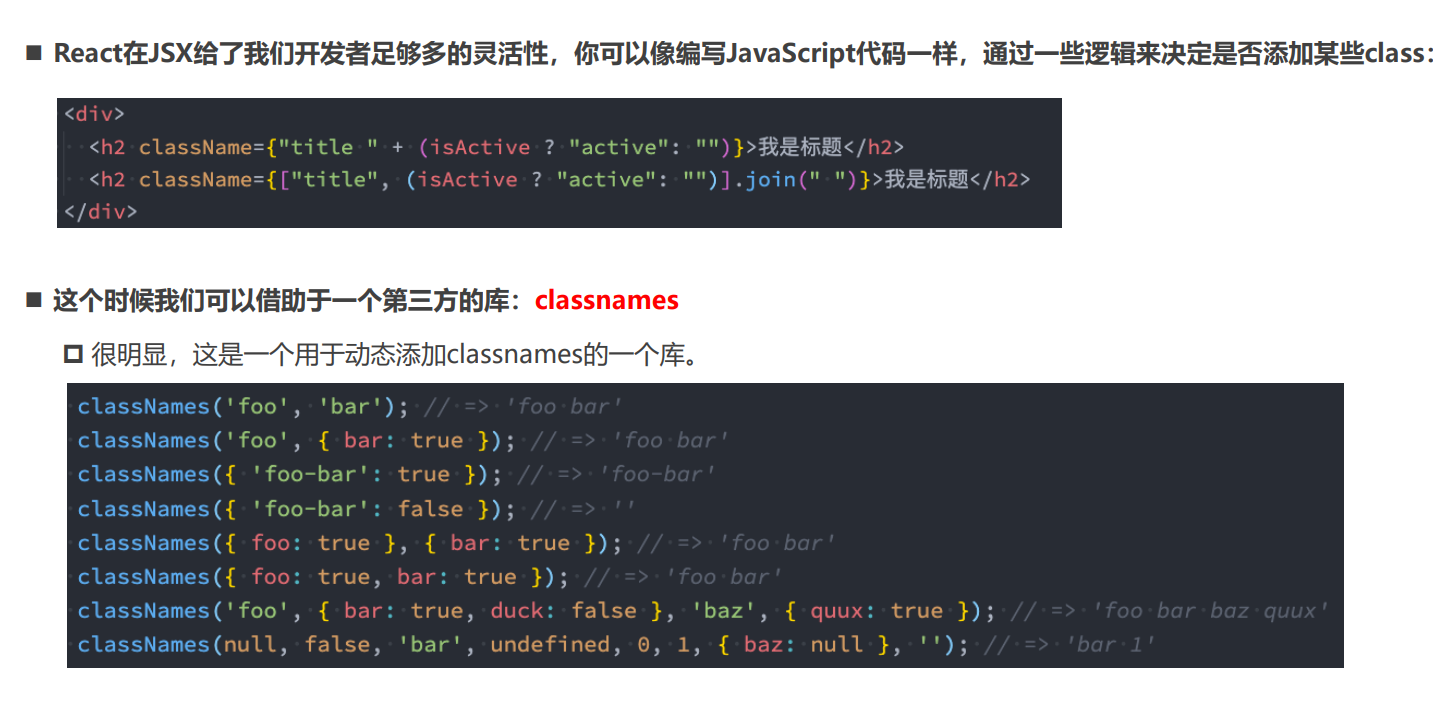
CSS in JS库:styled-components:
- CSS-in-JS使用JavaScript为CSS赋予一些能力,可以类似于CSS预处理器一样的样式嵌套、函数定义、逻辑复用、动态修改
- CSS预处理器也具备某些能力,但获取动态状态依然是一个不好处理的点
ES6标签模板字符串
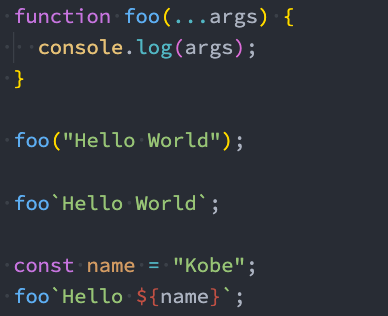
即函数可以通过字符串的方式来调用
- 第一个参数是数组,是被模块字符串拆分后的组合
- 后面的元素是一个个模块字符串传入的内容
- 注意是反引号
styled-components的使用
基本使用
jsx代码:
1 | import React from "react"; |
style.js代码:
1 | import styled from "styled-components"; |
- 样式js的命名不能和组件名称相同,例如不能用App.js
- 可以像正常CSS一样编写CSS代码
- 可以用&来获取当前元素
- 可以通过设置styled.__来设置包裹的类型
- styled返回的是一个组件,可以按照组件的方法使用
props\attrs属性
- 获取props需要通过${}传入一个插值函数,props会作为该函数的参数;
- 这种方式可以有效的解决动态样式的问题
CSS代码:
1 | import styled from "styled-components"; |
jsx代码:
1 | import React from "react"; |
注:
- tcolor不能与color同名,要不然会循环拿取
- tcolor传入的是一个函数,括号可以省略,会自动调用生成值
- tcolor:props=>(props.color||”blue”)是为了处理不传值时给定默认值,没有默认值时可以在下面直接取
styled的继承
CSS代码:
1 | import styled from "styled-components"; |
jsx代码:
1 | import React from "react"; |