为什么需要Hook 不编写class的情况下使用state以及其他的React特性
class组件 class组件的优势
class组件可以定义自己的state ,用来保存组件自己内部的状态
函数式组件不可以,因为函数每次调用都会产生新的临时变量
class组件有自己的生命周期 ,我们可以在对应的生命周期中完成自己的逻辑
比如在componentDidMount中发送网络请求,并且该生命周期函数只会执行一次
函数式组件在学习hooks之前,如果在函数中发送网络请求,意味着每次重新渲染都会重新发送一次网络请求
class组件可以在状态改变时只会重新执行render函数 以及我们希望重新调用的生命周期函数componentDidUpdate 等
函数式组件在重新渲染时,整个函数都会被执行,似乎没有什么地方可以只让它们调用一次
class组件存在的问题
复杂组件变得难以理解
我们在最初编写一个class组件时,往往逻辑比较简单,并不会非常复杂。但是随着业务的增多,我们的class组件会变得越来越复杂
比如componentDidMount中,可能就会包含大量的逻辑代码:包括网络请求、一些事件的监听(还需要在
而对于这样的class实际上非常难以拆分:因为它们的逻辑往往混在一起,强行拆分反而会造成过度设计,增加代码的复杂度
难以理解的class
在class中,我们必须搞清楚this的指向到底是谁,所以需要花很多的精力去学习this
组件复用状态很难
状态的复用我们需要通过高阶组件
像我们之前学习的redux中connect或者react-router中的withRouter,这些高阶组件设计的目的就是为了状态的复用
或者类似于Provider、Consumer来共享一些状态,但是多次使用Consumer时,我们的代码就会存在很多嵌套
Hook的作用 Hook可以解决上述class和函数组件存在的问题
它可以让我们在不编写class的情况下使用state以及其他的React特性
Hook的使用场景
Hook的出现基本可以代替我们之前所有使用class组件的地方
但是如果是一个旧的项目,你并不需要直接将所有的代码重构为Hooks,因为它完全向下兼容,你可以渐进式的来使用它
Hook只能在函数组件中使用,不能在类组件,或者函数组件之外的地方使用
Hooks的使用 Hooks只能在函数组件中使用
为什么Hooks中的函数都叫use,不叫create呢?
Hooks的一大作用是保存组件的状态,在下一次渲染时,返回当前的state
而create的意思是,每次渲染都重新创建,那么就与state只在组件初次渲染时被创建相反
useState的使用 useState主要在函数组件中定义state
1 2 3 4 5 6 7 8 9 10 11 12 13 14 15 16 17 18 import React , { memo, useState } from 'react' function App ( const [count, setCounter] = useState (0 ) console .log ("count" , count) console .log ("setCounter" , setCounter) return ( <div > <h2 > count:{count}</h2 > {/** * 注意:onClick传入的是一个函数,setCounter(count+1)是一个函数的调用,所以这里只能使用箭头函数,在函数调用里调用setCounter */} {/* <button onClick ={setCounter(count+1)} > +1</button > */} <button onClick ={() => {setCounter(count+1)}}>+1</button > </div > ) } export default memo (App )
useState如何实现状态 useState原理
Effect Hook
Effect Hook可以在函数组件中实现类似于生命周期的功能
网络请求、手动更新DOM、一些事件的监听,都是React更新DOM的一些副作用(不是页面渲染)
对于完成这些功能的Hook被称之为 Effect Hook
Effect Hook的基本使用 1 2 3 4 5 6 7 8 9 10 11 12 13 14 15 import React , { memo, useEffect, useState } from 'react' function App ( const [count, setCounter] = useState (0 ) useEffect (()=> { console .log ("监听redux中的数据变换,监听eventBus中的事件" ) }) return ( <div > <h2 > count:{count}</h2 > <button onClick ={() => {setCounter(count+1)}}>+1</button > </div > ) } export default memo (App )
Effect Hook的清除
多个Effect的使用
1 2 3 4 5 6 7 8 9 10 11 12 13 14 15 16 17 18 19 20 21 import React , { memo, useEffect, useState } from 'react' function App ( const [count, setCounter] = useState (0 ) useEffect (()=> { console .log ("监听redux中的数据变换,监听eventBus中的事件" ) return ()=> { console .log ("清除监听redux中的数据变换,清除监听eventBus中的事件" ) } }) useEffect (()=> { console .log ("获取网络请求" ) }) return ( <div > <h2 > count:{count}</h2 > <button onClick ={() => {setCounter(count+1)}}>+1</button > </div > ) } export default memo (App )
Effect的性能优化
1 2 3 4 5 6 7 8 9 10 11 12 13 14 15 16 17 18 19 20 21 import React , { memo, useEffect, useState } from 'react' function App ( const [count, setCounter] = useState (0 ) const [message, setMessage] = useState ("Hello!" ) useEffect (()=> { console .log ("监听redux中的数据变换,监听eventBus中的事件" ) return ()=> { console .log ("清除监听redux中的数据变换,清除监听eventBus中的事件" ) } },[count]) return ( <div > <h2 > count:{count}</h2 > <h2 > message:{message}</h2 > <button onClick ={() => {console.log("加count");setCounter(count+1)}}>+1</button > <button onClick ={() => {console.log("修改message");setMessage("你哈个锤子")}}>修改message</button > </div > ) } export default memo (App )
那么这里的两个回调函数分别对应的就是componentDidMount和componentWillUnmount生命周期函数了
useContext的使用 获取Context的方式:
类组件可以通过 类名.contextType = MyContext方式,在类中获取context
多个Context或者在函数式组件中通过 MyContext.Consumer 方式共享context
但是多个Context共享时会存在大量的嵌套
但是Provider依然会有嵌套
Provider代码:
1 2 3 4 5 6 7 8 9 10 11 12 13 14 15 16 17 18 import React from 'react' ;import ReactDOM from 'react-dom/client' ;import App from './App' ;import { HashRouter } from 'react-router-dom' ;import { ColorContext , BgrContext } from './Context' ;const root = ReactDOM .createRoot (document .getElementById ('root' ));root.render ( <ColorContext.Provider value ={{color: "red "}}> <BgrContext.Provider value ={{fontSize:36}} > <HashRouter > <App /> </HashRouter > </BgrContext.Provider > </ColorContext.Provider > );
useContext代码:
1 2 3 4 5 6 7 8 9 10 11 12 13 14 import React , { memo, useContext, useEffect, useState } from 'react' import { ColorContext , BgrContext } from './Context' function App ( const colorContext = useContext (ColorContext ) const bgrContext = useContext (BgrContext ) return ( <div > <h2 style ={{color:colorContext.color,fontSize:bgrContext.fontSize}} > 哈哈哈</h2 > </div > ) } export default memo (App )
useReducer的使用 useReducer仅仅是useState的一种替代方案
如果state的处理逻辑比较复杂,我们可以通过useReducer来对其进行拆分
或者这次修改的state需要依赖之前的state时,也可以使用
数据是不会共享的,它们只是使用了相同的counterReducer的函数而已
useReducer只是useState的一种替代品,并不能替代Redux
1 2 3 4 5 6 7 8 9 10 11 12 13 14 15 16 17 18 19 20 21 22 23 24 25 26 27 import React , { memo, useReducer } from 'react' const counterReducer = function (state, action ){ switch (action.type ){ case "increment" : return {...state, counter :state.counter +1 } case "decrement" : return {...state, counter :state.counter -1 } case "addNum" : return {...state, counter :state.counter +action.num } case "decNum" : return {...state, counter :state.counter -action.num } } } function App ( const [state, dispatch] = useReducer (counterReducer,{message :"Hello!" ,counter :100 }) return ( <div > <h2 > 当前计数:{state.counter}</h2 > <button onClick ={() => {dispatch({type:"increment"})}}>+1</button > <button onClick ={() => {dispatch({type:"decrement"})}}>-1</button > <button onClick ={() => {dispatch({type:"addNum", num:5})}}>+5</button > <button onClick ={() => {dispatch({type:"decNum", num:10})}}>-10</button > </div > ) } export default memo (App )
useReducer的参数与返回值:
第一个参数:reducer函数
reducer函数的参数一:上一次的state/useReducer的第二个参数
reducer函数的参数二:dispatch所传入的参数
reducer的返回值:新的状态(…state是为了保障除了这次改变的其余状态依然在新的状态中)
第二个参数:state初始值
第一个返回值:更新后的state值
第二个返回值:用于发起改变state的函数
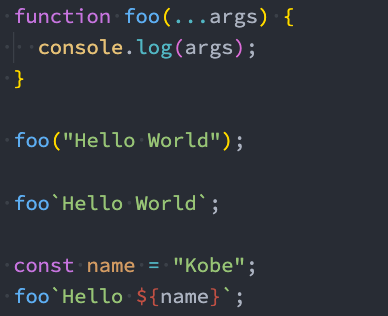
useCallback的使用 useCallback实际的目的是为了进行性能的优化
函数式组件在每次刷新时都会重新执行函数,那么里面的函数就会重新定义,虽然刷新后,原来定义的函数会被回收,但每次都定义也会影响性能,同时会生成新的foo
useCallback就可以实现当满足某些条件时重新定义函数,但得到相同的foo ,而如果有子组件依赖这个foo,相同的foo不会引起子组件的刷新
父组件代码:
1 2 3 4 5 6 7 8 9 10 11 12 13 14 15 16 17 18 19 20 21 22 23 24 import React , { memo, useCallback, useState } from 'react' import ChildComponent from './component/ChildComponent' function App ( const [count, setCount] = useState (100 ) const [message, setMessage] = useState (22 ) const changeCount = ( console .log ("修改count" ) setCount (count+1 ) } const changeMessage = ( console .log ("修改message" ) setMessage (Math .round ()) } return ( <div > <h2 > 当前计数:{count}</h2 > <h2 > Message:{message}</h2 > <ChildComponent changeMessage ={changeMessage}/ > <button onClick ={changeCount} > +1</button > </div > ) } export default memo (App )
子组件代码:
1 2 3 4 5 6 7 8 9 10 11 12 import React , { memo } from 'react' function ChildComponent (props ) { const {changeMessage} = props console .log ("子组件刷新" ) return ( <div > <button onClick ={changeMessage} > 子组件按钮修改Message</button > </div > ) } export default memo (ChildComponent )
可以看出每次修改count都会刷新不依赖count子组件,会造成性能浪费
useCallback的基本使用 1 2 3 4 5 6 7 8 9 10 11 12 13 14 15 16 17 18 19 20 21 22 23 24 import React , { memo, useCallback, useState } from 'react' import ChildComponent from './component/ChildComponent' function App ( const [count, setCount] = useState (100 ) const [message, setMessage] = useState (22 ) const changeCount = useCallback (()=> { console .log ("修改count" ) setCount (count+1 ) },[count]) const changeMessage = useCallback (()=> { console .log ("修改message" ) setMessage (Math .round ()) },[]) return ( <div > <h2 > 当前计数:{count}</h2 > <h2 > Message:{message}</h2 > <ChildComponent changeMessage ={changeMessage}/ > <button onClick ={changeCount} > +1</button > </div > ) } export default memo (App )
可以看出点击更改count后,子组件并未刷新
useCallback的参数与返回值:
参数一:需要处理的函数
参数二:该函数改变依赖的状态,如果该依赖的状态不变,就返回相同的函数,相同的函数不会引起依赖该函数子组件的刷新
返回值:返回一个函数的 memoized(记忆的) 值
使用useCallback的目的是不希望子组件进行多次渲染,并不是为了函数进行缓存
并不是不会新定义函数,新定义函数是一定的
只针对子组件的渲染次数做优化,在本组件层面是没有优化的
useMemo的使用 useMemo也是为了进行性能的优化:
同样是返回一个memoized(记忆的)值
在依赖不变的情况下,多次定义的时候,返回的值是相同的
useCallback是在依赖不变的情况下,多次定义的时候,返回的函数是相同的
useMemo针对变量进行优化,useCallback针对函数进行优化
useMemo的使用案例:
进行大量的计算操作,是否有必须要每次渲染时都重新计算
对子组件传递相同内容的对象时,使用useMemo进行性能的优化
父组件代码:
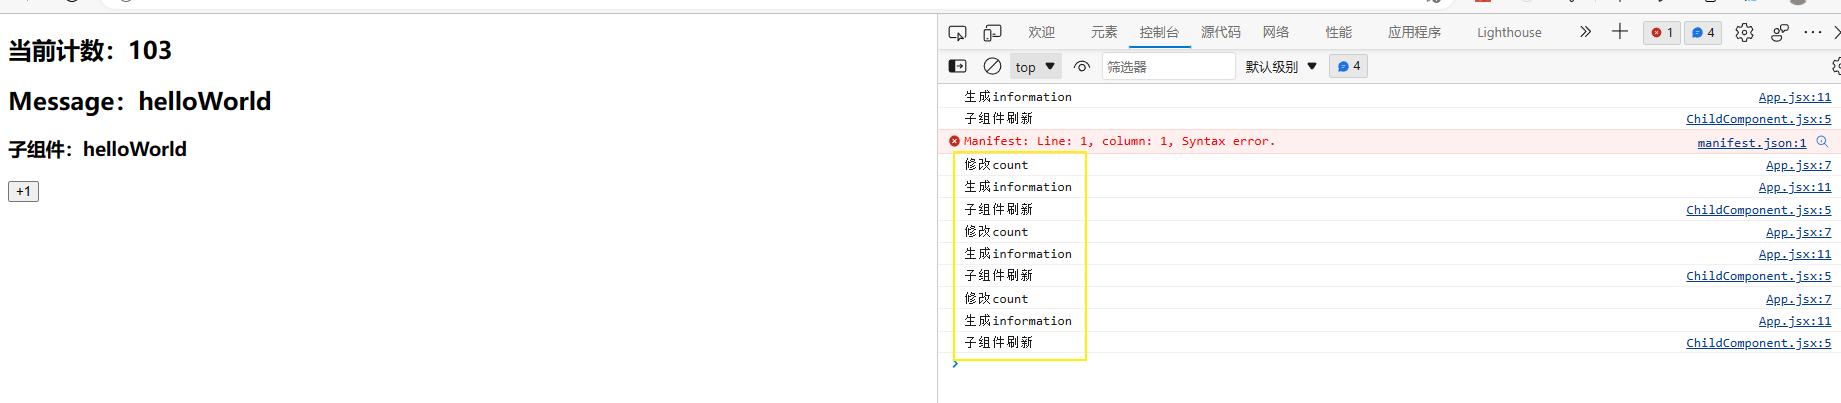
1 2 3 4 5 6 7 8 9 10 11 12 13 14 15 16 17 18 19 20 21 22 23 24 import React , { memo, useCallback, useState } from 'react' import ChildComponent from './component/ChildComponent' function App ( const [count, setCount] = useState (100 ) function changeCount ( console .log ("修改count" ) setCount (count+1 ) } function foo (information ){ console .log ("生成information" ) return {...information,message :"helloWorld" } } const information = foo ({message :message}) return ( <div > <h2 > 当前计数:{count}</h2 > <h2 > Message:{information.message}</h2 > <ChildComponent information ={information}/ > <button onClick ={changeCount} > +1</button > </div > ) } export default memo (App )
子组件代码:
1 2 3 4 5 6 7 8 9 10 11 12 import React , { memo } from 'react' function ChildComponent (props ) { const {information} = props console .log ("子组件刷新" ) return ( <div > <h3 > 子组件:{information.message}</h3 > </div > ) } export default memo (ChildComponent )
可以看出:
每次更新count后,message是不变的,那么information,也就不必要每次都去运行foo函数,当foo函数逻辑赋值时会引起性能浪费
子页面仅依赖于message,这里明显每次都是得到的information值是一样的,但由于是不同的对象,子组件每次也会刷新
useMemo的基本使用 1 2 3 4 5 6 7 8 9 10 11 12 13 14 15 16 17 18 19 20 21 22 23 24 25 26 27 28 import React , { memo, useMemo, useState } from 'react' import ChildComponent from './component/ChildComponent' function useFoo (message ){ const res = useMemo ((message )=> { console .log ("生成information" ) return {message :message+"修改后" } },[message]) return res } function App ( const [count, setCount] = useState (100 ) const [message, setMessage] = useState ("helloWorld" ) function changeCount ( console .log ("修改count" ) setCount (count+1 ) } let information = useFoo (message) return ( <div > <h2 > 当前计数:{count}</h2 > <h2 > Message:{message}</h2 > <ChildComponent information ={information}/ > <button onClick ={changeCount} > +1</button > </div > ) } export default memo (App )
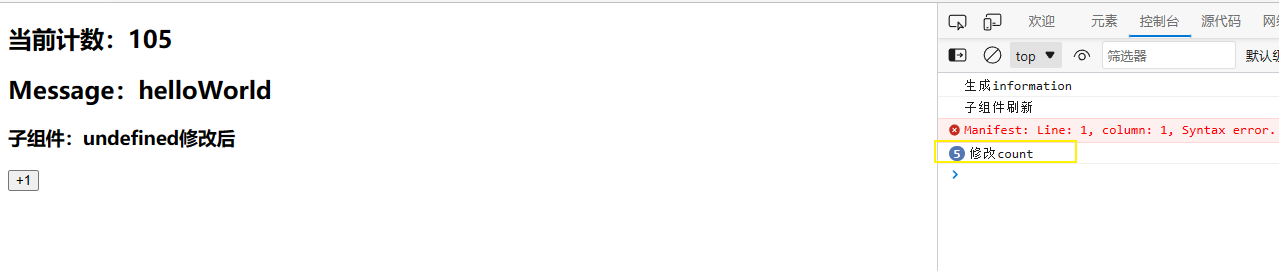
可以看出:
修改count后,依赖于message的函数不再重新执行,子组件也不再刷新
注意:
useMemo这种Hook函数,只能在函数组件和hook函数中使用,自定义hook函数,以use开头,use后的第一个字母为大写
useMemo不会传递参数,因为useMemo是由React调用的,我们不知道其在上面时候调用,也就无法传参数进行
useMemo的参数与返回值
参数一:useMemo判断是否执行的函数
参数二:useMemo依赖的值,如果这个值没变,就不会执行传入的函数,直接返回上一次的计算值
返回值:返回一个带记忆的值
useRef的使用 useRef返回一个ref对象,返回的ref对象再组件的整个生命周期保持不变
useRef基本使用
用法一:引入DOM(或者组件,但是需要是class组件)元素
1 2 3 4 5 6 7 8 9 10 11 12 13 14 15 import React , { memo, useRef} from 'react' function App ( const inputRef = useRef () const buttonClick = ( console .log (inputRef.current ) inputRef.current .focus () } return ( <div > <input type ="text" ref ={inputRef}/ > <button onClick ={buttonClick} > 修改</button > </div > ) } export default memo (App )
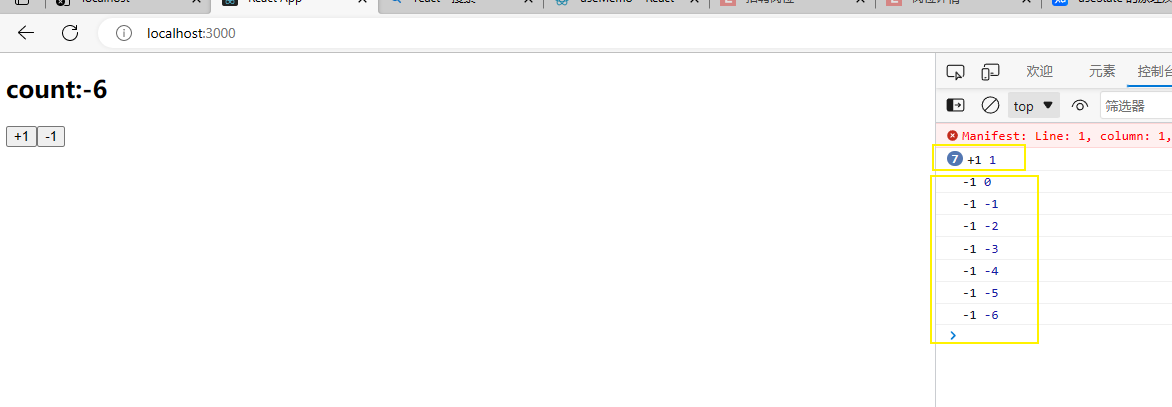
用法二:保存一个数据,这个对象在整个生命周期中可以保存不变(解决闭包陷阱)
由于函数里的count是获取上层作用域里的,也就是闭包,那么无论页面刷新多少次,函数里的count都是函数定义是的count 0,因此无论多少次点击得到的结果都是1(当然这里可以设置依赖count——仅颜色useRef的作用,所以没有添加)
而使用inputRef所得到的对象每次本身就是一样的,那么有没有闭包陷阱也就无所谓,因为我们本身就是要获取相同的值,而通过修改inptRef这个对象里面的值,从而获得相同的对象不同的值,解决闭包陷阱
1 2 3 4 5 6 7 8 9 10 11 12 13 14 15 16 17 18 19 20 21 22 import React , { memo, useCallback, useRef, useState} from 'react' function App ( const [count,setCount] = useState (0 ) const buttonClick = useCallback (function ( console .log ("+1" ,count+1 ) setCount (count+1 ) },[]) const inputRef = useRef () inputRef.count = count const buttonClick1 = useCallback (function ( console .log ("-1" ,inputRef.count -1 ) setCount (inputRef.count -1 ) },[]) return ( <div > <h2 > count:{count}</h2 > <button onClick ={buttonClick} > +1</button > <button onClick ={buttonClick1} > -1</button > </div > ) } export default memo (App )
父组件传ref给子组件
方式一:作为参数放到props中传递过去——参数名不能使用ref
方式二:利用forwardRef传递给子组件
父组件代码:
1 2 3 4 5 6 7 8 9 10 11 12 13 14 15 16 17 import React , { memo, useRef, useState} from 'react' import ChildComponent from './component/ChildComponent' function App ( const inputRef = useRef () const buttonClick = ( console .log (inputRef.current ) inputRef.current .focus () inputRef.current .value = "" } return ( <div > <ChildComponent ref = {inputRef}/ > <button onClick ={buttonClick} > showref</button > </div > ) } export default memo (App )
子组件代码:
1 2 3 4 5 6 7 8 9 10 import React , { forwardRef, memo } from 'react' function ChildComponent (props, ref ) { return ( <div > <input type ="text" ref ={ref}/ > </div > ) } export default memo (forwardRef (ChildComponent ))
注:要使用ref参数,子组件需用forwardRef包裹,且要使用memo的话,memo在forwardRef外层
useImperativeHandle的使用
上述通过父组件中的ref传递给子组件中的元素,可以在父组件中获得子组件元素,对子组件元素进行操作
将整个元素给到父组件,就容易在父组件中过渡使用,从而在某种情况下产生某种bug,如上述代码,点击showref会在聚焦子组件input的同时,将其值修改为空
useImperativeHandle就是为了解决样的问题,不直接把子组件元素给到父组件,而是把子组件元素的某些操作给到父组件
1 2 3 4 5 6 7 8 9 10 11 12 13 14 15 16 17 18 import React , { forwardRef, memo, useImperativeHandle, useRef } from 'react' function ChildComponent (props, ref ) { const inputRef = useRef () useImperativeHandle (ref, ()=> { return { focus :()=> { inputRef.current .focus () } } }) return ( <div > <input type ="text" ref ={inputRef}/ > </div > ) } export default memo (forwardRef (ChildComponent ))
useImperativeHandle的基本使用
参数一:父组件传给子组件的ref
参数二:回调函数,函数返回结果是传递给父组件的属性值对象,如这里只传了focus函数,那么父组件中就只有focus属性生效,其余属性无效
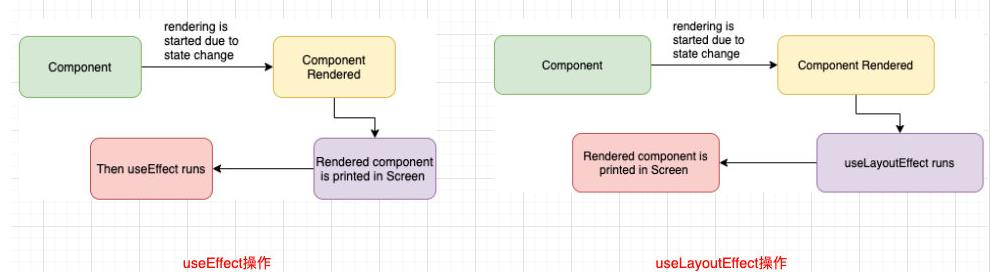
useLayoutEffect使用 useLayoutEffect看起来和useEffect非常的相似,事实上他们也只有一点区别而已:
useEffect会在渲染的内容更新到DOM上后执行,不会阻塞DOM的更新
useLayoutEffect会在渲染的内容更新到DOM上之前执行,会阻塞DOM的更新
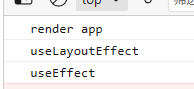
useEffect与useLayoutEffect执行顺序演示 1 2 3 4 5 6 7 8 9 10 11 12 13 14 15 16 import React , { memo, useEffect, useLayoutEffect} from 'react' function App ( useEffect (()=> { console .log ("useEffect" ) }) useLayoutEffect (()=> { console .log ("useLayoutEffect" ) }) console .log ("render app" ) return ( <div > <h2 > 哈哈哈</h2 > </div > ) } export default memo (App )
注:先”render app”,等数据更新后,渲染到DOM前执行useLayoutEffect,渲染结束后执行useEffect
useLayoutEffect的作用 在页面即将刷新错误数据前及时拦截
使用useEffect代码:
1 2 3 4 5 6 7 8 9 10 11 12 13 14 15 16 17 18 19 20 21 import React , { memo, useEffect, useState} from 'react' function App ( const [count, setCount] = useState (10 ) useEffect (()=> { if (count===0 ){ setCount (10 ) } console .log ("useEffect" ,count) }, [count]) console .log ("render app" ) function buttonClick ( setCount (count-1 ) } return ( <div > <h2 > count:{count}</h2 > <button onClick ={buttonClick} > -1</button > </div > ) } export default memo (App )
使用useLayoutEffect代码:
1 2 3 4 5 6 7 8 9 10 11 12 13 14 15 16 17 18 19 20 21 import React , { memo, useLayoutEffect, useState} from 'react' function App ( const [count, setCount] = useState (10 ) useLayoutEffect (()=> { if (count===0 ){ setCount (10 ) } console .log ("useEffect" ,count) }, [count]) console .log ("render app" ) function buttonClick ( setCount (count-1 ) } return ( <div > <h2 > count:{count}</h2 > <button onClick ={buttonClick} > -1</button > </div > ) } export default memo (App )
自定义Hook 自定义Hook本质上只是一种函数代码逻辑的抽取,严格意义上来说,它本身并不算React的特性
注:
自定义Hook以use开头,且use后的字母要大写
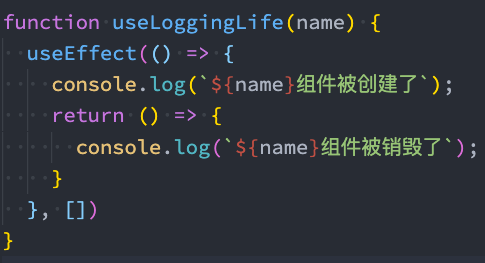
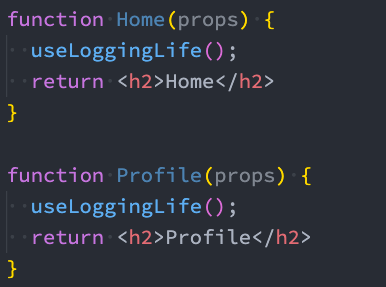
自定义Hook——所有的组件在创建和销毁时都进行打印
组件被创建:打印 组件被创建了
组件被销毁:打印 组件被销毁了
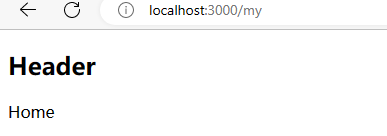
自定义Hook——Context的共享
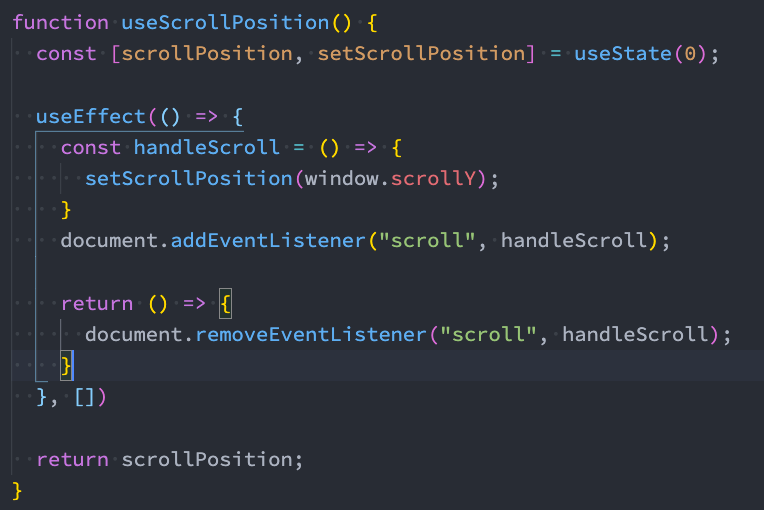
自定义Hook——获取滚动位置
redux hooks的使用
在之前的redux开发中,为了让组件和redux结合起来,我们使用了react-redux中的connect
但是这种方式必须使用高阶函数结合返回的高阶组件
且必须编写:mapStateToProps和 mapDispatchToProps映射的函数
useSelector的作用是将state映射到组件中
参数一:将state映射到需要的数据中
参数二:可以进行比较来决定是否组件重新渲染;(后续讲解)
useSelector默认会比较我们返回的两个对象是否相等
也就是我们必须返回两个完全相等的对象才可以不引起重新渲染
useDispatch非常简单,就是直接获取dispatch函数,之后在组件中直接使用即可
我们还可以通过useStore来获取当前的store对象
redux的常规使用——使用connect函数 整个项目index.js代码:
1 2 3 4 5 6 7 8 9 10 11 12 import React from 'react' ;import ReactDOM from 'react-dom/client' ;import App from './App' ;import { Provider } from 'react-redux' ;import store from './stero' ;const root = ReactDOM .createRoot (document .getElementById ('root' ));root.render ( <Provider store ={store} > <App /> </Provider > );
countSlice.js代码
1 2 3 4 5 6 7 8 9 10 11 12 13 14 15 16 17 import { createSlice } from "@reduxjs/toolkit" ;const countSlice = createSlice ({ name :"count" , initialState :{ count :5 }, reducers :{ addCountAction (state, action ){ state.count += action.payload } } }) export const {addCountAction} = countSlice.actions const countReducer = countSlice.reducer export default countReducer
导出的stero的index.js代码:
1 2 3 4 5 6 7 8 9 import { configureStore } from "@reduxjs/toolkit" ;import countReducer from "./countSlice" ;const store = configureStore ({ reducer :{ counter :countReducer } }) export default store
stero使用的jsx代码:
1 2 3 4 5 6 7 8 9 10 11 12 13 14 15 16 17 18 19 20 21 22 23 24 25 26 27 28 29 30 31 import React , { memo, useLayoutEffect, useState} from 'react' import { connect } from 'react-redux' ;import { addCountAction } from './stero/countSlice' ;function App (props ) { const {count, addCount} = props function buttonCLick ( addCount (3 ) } return ( <div > <h2 > count:{count}</h2 > <button onClick ={buttonCLick} > +3</button > </div > ) } function mapStateToProps (state ){ return { count :state.counter .count } } function mapAction20Props (dispatch ){ return { addCount (count ){ dispatch (addCountAction (count)) } } } export default connect (mapStateToProps, mapAction20Props)(memo (App ))
注:
这种方式必须使用高阶函数结合返回的高阶组件
并且必须编写:mapStateToProps和 mapDispatchToProps映射的函数
redux的Hook使用 useSelector与useDispatch的使用 App.jsx代码:
1 2 3 4 5 6 7 8 9 10 11 12 13 14 15 16 17 18 19 20 21 22 23 24 25 26 27 28 29 import React , { memo} from 'react' import { useDispatch, useSelector } from 'react-redux' ;import ChildComponent from './component/ChildComponent' ;import { addCountAction } from './stero/countSlice' ;function App (props ) { console .log ("App渲染" ) const {count} = useSelector ((state )=> ({ count :state.counter .count })) const dispatch = useDispatch () function buttonCLick ( dispatch (addCountAction (4 )) } return ( <div > <h2 > count:{count}</h2 > <ChildComponent /> <button onClick ={buttonCLick} > 改变count</button > </div > ) } export default memo (App )
注:
可以看到能够直接使用useSelector对stero中的数据进行映射,直接通过useDispatch获取dispatch
但是上述会出现一些问题:
useSelector是监听的是state,也就是state改变后,所有使用useSelector的组件都会刷新
ChildComponent代码:
1 2 3 4 5 6 7 8 9 10 11 12 13 14 15 import React , { memo } from 'react' import { useSelector } from 'react-redux' function ChildComponent (props ) { console .log ("子组件渲染" ) const {message} = useSelector ((state )=> ({ message :state.counter .message })) return ( <div > <h2 > 子组件:{message}</h2 > </div > ) } export default memo (ChildComponent )
子组件只与state中的message有关,但当count改变时子组件依然会刷新,会引起性能的降低
给useSelector设置shallowEqual就可以避免上述问题,实际上是进行一个浅层比较,如果相同就不更新
1 2 3 4 5 6 7 const {message} = useSelector ((state )=> ({message :state.counter .message }),shallowEqual) const {count} = useSelector ((state )=> ({count :state.counter .count }),shallowEqual)